First-party tracking subdomain setup and checks
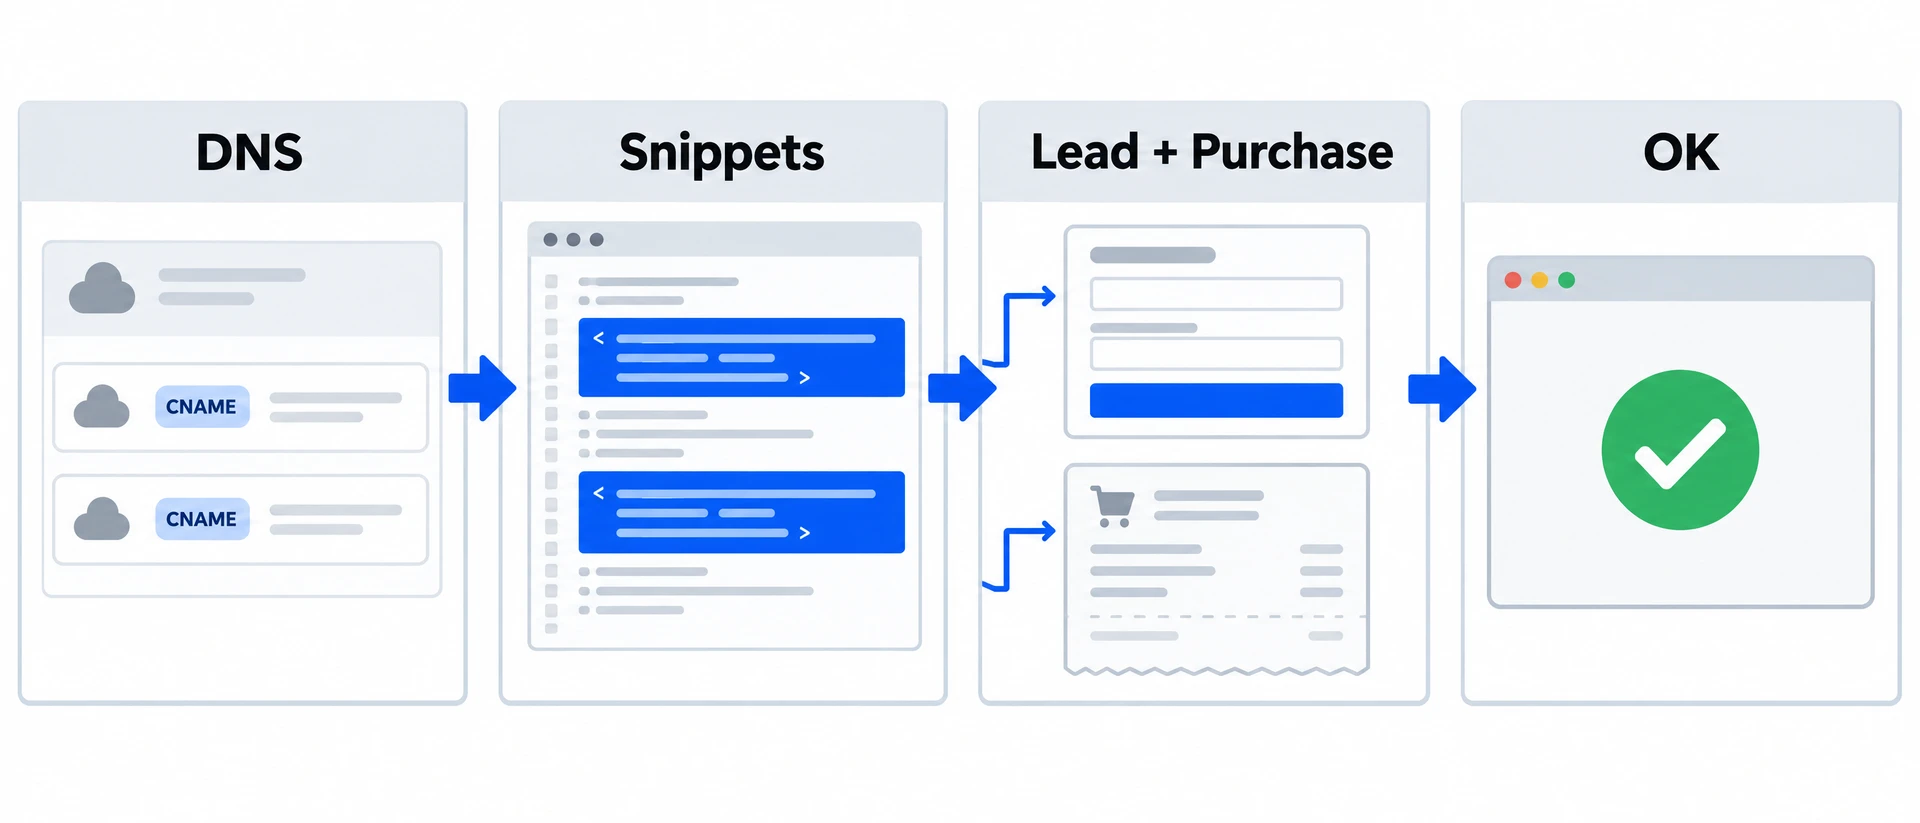
Set up your tracking subdomain: add the DNS records, check DNS and HTTPS, test for server-side tracking, and follow onboarding to your first event.

Shahzada Ali Hassan, founder of Crisperchecked against 2 sources
The short answer
A first-party tracking subdomain is a name on your own domain, such as ctx.yourwebsite.com, that your tracking runs through. Set it up by adding the DNS records from your Crisper Domain page, then check DNS and the HTTPS certificate with the free checker. It is for owners and marketers running Meta or Google ads on their own site.
- The free checker reads CNAME, IPv4, IPv6 and nameservers, and checks certificates separately.
- Certificates are checked on up to three tracking subdomains your page uses.
- The server-side verdict comes from a short browser scan of your home page, the subdomain you typed, or the site a tracking subdomain belongs to.
- Your Domain page lists the exact records to add; the checker does not read your events.
- Checked against Crisper's tracking checker and dashboard copy on 15 November 2026.
FREE AUDIT
NO LOGINCheck what Meta and Google can count on your site
- Your site
 Crisper
- Meta and Google count it
Enter your website to see how good its tracking is, and whether Meta is likely restricting it.
To set up a first-party tracking subdomain, add the DNS records Crisper shows on your website's Domain page, wait for them to resolve, then check the name and its HTTPS certificate. Your tracking then loads and sends hits through a subdomain of your own site.
This page follows the job in order: check DNS and the certificate, see what the Domain view says is next, test whether a site already tracks server-side, download the instructions for your platform, and follow onboarding to your first event. The code work, snippets and events, is on the developer checklist.
An HTTPS certificate proves a name belongs to the server answering for it; Let's Encrypt explains howletsencrypt.org a certificate authority checks control of a domain before it issues one. That is why the checker reads DNS and the certificate as two separate results.
01How do you check your tracking subdomain's DNS and certificate?
A DNS record and an HTTPS certificate are two different parts of setting up a tracking subdomain. The free checker shows each one, so you can see which part needs attention. It is free and needs no account; you add your first name, email and mobile number to open your saved check.
Check the public DNS record
Where to find it: Tools → Tracking subdomain checker → your saved check → DNS
Enter your website or a tracking subdomain. The checker reads the name through a public resolver and shows whether it has a CNAME, how many IPv4 (A) and IPv6 (AAAA) addresses it has, and the nameservers for your domain. A CNAME that points outside your domain is shown as pointing to a hosted service. If the lookup cannot finish, it says so instead of reporting a broken record.
When to use it: After adding a tracking or script-loader subdomain to your DNS settings.
See the certificate result separately
Where to find it: Tools → Tracking subdomain checker → your saved check → verdict
The checker opens your page in a browser and checks the certificates of up to three tracking subdomains of your site that the page uses. One line under the verdict says whether they passed our check, have a certificate problem, could not complete a verified HTTPS connection, expire soon, or could not be checked this time. It checks the subdomains your page uses, not the name you typed in.
When to use it: When DNS looks right but you are unsure whether HTTPS is ready.
DNS and HTTPS are only part of setup
A passing check does not confirm your account connection, installed tracking or event delivery. A subdomain your page does not use on this visit gets no certificate check. Custom setups can use different records; follow the records in your Crisper Domain tab. DNS changes may appear at different times elsewhere.
DNS records take time to appear, so the next question is what to do while you wait and after they resolve.
02How do you follow your domain setup?
After adding DNS records, you need to know whether to wait, correct a record or install the tracking script. The new Domain view brings that next step together with your setup progress, both for existing websites and when you add a new one.
Follow setup from DNS to the tracking script
Where to find it: Dashboard → your website → Domain
The page shows your tracking subdomain's status, its DNS provider when detected, and how many checked regions can resolve it. Setup events show the stages already completed and what comes next. Copy the DNS names and values, use Check now after making a change, or share the instructions with whoever manages your website.
When to use it: Check here after changing DNS, or when you need to see what is holding up setup.
Follow the same setup steps when adding a website
Where to find it: New website setup → DNS step
The DNS step shows your tracking subdomain's status, the records to add and your setup progress. On phones, records appear as cards and move ahead of the progress timeline while DNS still needs work. After you choose Check now, once your subdomain's DNS is verified and HTTPS is ready, or DNS is verified and your site already sends traffic, the page moves you on to the next setup step left to do. The Domain page has a layout of its own, so the two do not look the same.
When to use it: Keep the required records and setup progress in view while you or your website manager connect the subdomain.
Verified refers to the subdomain
A verified subdomain is one part of setup. You still need to install the tracking script and connect your integrations; this status does not confirm that an ad platform received a conversion.
Once the subdomain resolves, the checker can also show how your certificates and tracking look from the outside.
03What should you do after the tracking checker runs?
The tracking checker goes beyond listing records. It checks the certificates on tracking subdomains your page uses, explains what each finding means, and names the fix to make first.
What does the expanded checker show?
Where to find it: Tools → Tracking subdomain checker
Enter your website or tracking subdomain, then add your first name, email and mobile number to open your saved check. It explains your DNS provider, where tags load from and the observed lifetime of browser IDs, with Safari guidance where it applies. A certificate line under the verdict summarises checks on up to three tracking subdomains seen on the page. The fix card names one change to make first and, when that is a DNS change, links to your DNS settings. Book a free 30-min call to go through the check, or choose Check another website.
When to use it: When you or your developer need to understand a tracking setup or decide what to check next.
A scan is a snapshot
Certificates are checked on tracking subdomains observed during the page visit, which may differ from the name you entered. A passing check does not confirm conversion delivery. When a check cannot finish, the result says so.
Read next
- Open the tracking checker: Enter your website to get the verdict, the fix to make first and your DNS records.
The same checker works on any website, which helps you see where you stand before or after setup.
04How do you check if a website uses server-side tracking?
Setting up server-side tracking and having your hits actually go through it are two different things. The free checker looks at any website, not only Crisper setups: enter your site, and it reads your DNS records, runs a short browser scan of your page and saves a report with a plain verdict on what the scan saw.
How to check for server-side tracking on your website
Where to find it: Tools → Tracking subdomain checker
Enter your website, such as yourwebsite.com, or a tracking subdomain, and select Check. Your check gets its own page, which shows its progress while it reads DNS, checks your tags in a real browser and saves your report. Add your first name, email and mobile number to open it. The verdict says what the scan saw: hits sent through a subdomain of your own domain, tags loaded from one with no hits through it, IDs only your server could have set with no hits through your subdomain, tracking with no hits through your subdomain at all, or no Meta or Google tracking. Below it you see where your tags load from and which of the Meta browser ID (_fbp), the Meta click ID (_fbc) and the Google Analytics ID (_ga) are set, marking any that only your server could have set. The fix card names the change to make first. From there, book a free 30-min call to go through the report, or choose Check another website. Checks you run on this device appear under Your recent checks.
When to use it: Before you set up server-side tracking, to see where you stand, or after, to see whether hits go through your own subdomain.
How to see your tracking subdomain's DNS records
Where to find it: Tools → Tracking subdomain checker → your saved check → DNS
The DNS section of your saved check shows whether the name you entered has a CNAME, how many IPv4 (A) and IPv6 (AAAA) addresses it has, and the nameservers for your domain, which tell you where to add or change a record. When it recognises the company that manages your DNS, it names it. A CNAME that points outside your domain is shown as pointing to a hosted service.
When to use it: When you've added a DNS record for tracking and want to see what the internet sees, or where to add one.
Server-side tracking in your free audit report
Where to find it: Tools → Free Meta Restriction Check → your report → Server-side tracking
Reports based on a completed browser scan include a Server-side tracking section with the same verdict, where your tags load from and which IDs are set. Once you open the report with your first name, email and mobile number, it also shows how many tracking subdomains we saw your page use. The checker and the audit are separate checks: run the audit to see this section.
When to use it: When you've run the free audit and want to know how your tracking reaches Meta and Google.
How the checker decides
The checker reads your public DNS and loads your page the same way the free audit does. The scan blocks the collection requests it recognizes.
- Reads the DNS for the name you entered through a public resolver, and the nameservers for your domain.
- Loads a page in a real browser and records every request your tags make; it may also visit a second page. For your domain or its www name that is your home page, for a tracking subdomain the site it belongs to, and for any other subdomain its own page.
- Looks for hits sent to a subdomain of your own site, tags loaded from one, and cookies only your server could have set (ones scripts can't read or write).
- Reads the DNS of up to three tracking subdomains it saw, then gives the verdict.
What the verdict doesn't tell you
The verdict reflects a short browser scan, which may also visit a second page on your site. A server-side setup can still send the wrong events or miss pages, and the checker doesn't read your events in Meta or Google.
Read next
- Run the tracking subdomain check: Enter your website to see your DNS records and the server-side tracking verdict.
- Free Meta Restriction Check: The full report for your site: restriction estimate, tracking score and what to fix first.
- Do ad blockers stop Google Tag Manager and analytics?: Why hits sent from the browser go missing, and what server-side tracking changes.
If someone else manages your website, hand them the instructions for your platform.
05Where do you get setup instructions for your platform?
When someone else manages your website, they need the same instructions you see in Crisper. The downloaded setup PDF now matches your selected platform, so a Shopify install gets the app steps instead of generic code snippets. You can use it yourself or pass it to your developer.
A setup PDF for the selected platform
Where to find it: Dashboard → your website → Tracking script → Share instructions → Download PDF
Choose your website platform before downloading. The PDF includes your DNS records, then the appropriate app instructions or Head and Body code snippets. Shopify instructions cover tracking details, store events, the checkout pixel, and purchase and refund notifications. Downloads from other pages use the website's saved platform.
When to use it: Give whoever manages your website the DNS records and installation steps they need.
Copy values as you work through setup
Where to find it: Dashboard → your website → Tracking script
The page puts each setting beside its value and copy control, with the switches and save steps alongside. Shopify's four steps can be marked done as you go. Your platform choice stays in the page link, so reopening that link brings you back to the same instructions.
When to use it: Work through the installation with your website settings open beside Crisper.
Instructions still need to be applied
The PDF is available once Crisper has your tracking domain's setup details and DNS records. Downloading it or marking a step done does not install tracking or confirm that events have reached an ad platform.
Onboarding ties these steps together from your website to your first event.
06How do you get from a new website to your first event?
Setting up Crisper takes a few steps: add your website, start your plan and book your setup call, then confirm your domain, connect your ad platform and install the script in any order, and test a conversion. Each step now leads with one main action and says plainly what to do next.
Add your website without waiting for the platform check
Where to find it: Onboarding → Which site is losing conversions?
Crisper checks your website's platform while you keep going. When it finishes it shows what it found, or that it could not tell, and you can change the platform later in website settings. The main button now reads Continue to billing. Since 15 November, a new account with no website and no billing starts on Book your onboarding call, with Pick a time; choose Add your website yourself to go on to this step.
When to use it: When you are adding your first website.
Book a setup call, or carry on yourself
Where to find it: Onboarding → Book your setup call
Choose a time and book the call, or choose I’ll set it up myself to carry on without one. Call times are shown in your own time zone. If no times are open, the step says so and offers Check available times; if the calendar does not load, choose Try again.
When to use it: When you want the founder to set up your first domain with you.
Plainer steps for your ad platform, script and first test
Where to find it: Onboarding → Connect your ad platform, Install tracking on your site, Test your first conversion
Connect your ad platform asks you to choose the platform that should receive your events; you can also choose Use an existing integration. Install tracking on your site tells you to follow your platform's instructions below. The last step, Test your first conversion, asks you to make a test purchase or submit a lead form, then choose Check now. Buttons are larger on phones, and the step navigation no longer jumps while a page loads.
When to use it: When you are installing tracking and checking it works.
The steps are the same, only clearer
This changes how onboarding looks and reads. The steps, your plan, the domain records and the tracking you install work as before.
Since 18 November, onboarding also uses the dashboard's full-width layout, with the setup guide beside each step; see Onboarding uses the dashboard's layout.
Read next
- See what your tracking subdomain needs next: How the domain step shows what is left to do.
- Download setup instructions that match your website platform: Hand your developer the steps for your platform.
07What arrives by email after you sign up?
Until now, creating an account sent no email. New sign-ups now get a welcome email that lays out the setup, and a single reminder if setup stalls. You can turn the reminder off in your notification settings.
What the welcome email says
Where to find it: Your inbox, a few minutes after you sign up
The email, from the founder, asks you to open setup and add the domain whose Lead and Purchase events you want to recover. It explains that billing starts at checkout and that the billing screen shows the plan before you confirm. Setup for your first domain is included on a call with the founder; the email names the access to have ready, your DNS login, Full control on your Facebook Business Manager and your website's CMS or back-end login, or asks you to bring whoever manages your website. Continue setup takes you back to onboarding, and a reply reaches the founder.
When to use it: When you have just created your account and want to know what to do next.
The setup-call reminder, and how to turn it off
Where to find it: Dashboard → Organization settings → Notifications → Setup help emails
If your first domain isn't set up a day after you start, Crisper sends one reminder. It explains that Lead and Purchase events don't reach Meta until tracking is installed, lists what to have ready, and links to book your setup call, or to continue setup if you haven't reached the call step yet. Setup help emails is on by default; the switch is on the Notifications page, which you can open during onboarding, and the email has its own link to turn it off.
When to use it: When you would rather not get the reminder, or want to check that it is on.
Who gets these emails
The welcome email goes once, to new accounts. People invited into an existing workspace, existing customers, and anyone who opted out of email don't get it. The reminder is sent at most once, and not if you turned off setup help emails or paused optional emails. Reminders that were already due before this change are not sent late.
Read next
- Clearer onboarding from your website to your first event: The setup steps the welcome email walks you through.
- How Crisper recovers Lead and Purchase on a restricted domain: Follow a conversion and see what the setup involves.
08How do you install Crisper on WordPress with the Crisper plugin?
On a WordPress site, download the Crisper plugin from your website's install step, upload it in WordPress and activate it. The plugin adds the tracking script for you and sends to your site's tracking subdomain. New versions arrive on WordPress's Plugins screen, like any other plugin update.
Where can you find it?
Where to find it: Dashboard → your website → Tracking script → Download the Crisper plugin, then WordPress admin → Plugins → Add Plugin → Upload Plugin
The install row names your website and its steps. The Download the Crisper plugin button saves crisper.zip; then upload the zip, and click Install Now, then Activate. The plugin has no settings page to fill in.
When to use it: Use it when your website runs on WordPress and your tracking subdomain is set up, instead of pasting head and body scripts into your theme.
How does it work?
The plugin reads your site's own domain and loads tracking from its tracking subdomain at the top of every page. On a WooCommerce store it also sends shop events, such as viewed items, add to cart, begin checkout and purchase, and a purchase and refund notification for each order. Its row on the Plugins screen links to Open Crisper, Event logs and Setup check. New versions come from Crisper, and WordPress shows them with its usual update notice and View details.
Do not paste head or body scripts while the Crisper plugin is active. If the GTM Server Side plugin is also active, the Crisper plugin shows a notice asking you to deactivate it, so events are not counted twice.
What should you keep in mind?
The plugin does not set up your account. Your tracking subdomain and your integrations are still set up in Crisper, and the plugin needs that subdomain set up in Crisper before its tracking works. Without WooCommerce, the plugin only adds the tracking script: it sends no shop events and no order notifications. A site whose tracking runs on a different tracking domain, not its own tracking subdomain, sees a notice in Crisper and gets the steps for a separate server-side tracking plugin instead.
Read next
Check your tracking subdomain, follow your domain setup, or verify your events in Meta.
09Can you install the tracking script before your domain is live?
Yes. Once billing starts for a website, you can confirm your domain, install the tracking script and connect your integrations in any order. The Tracking script page shows your script straight away, even while your tracking subdomain's DNS or HTTPS is still pending, so you or your developer can install it without waiting for the domain.
Install the script while DNS is pending
Where to find it: Dashboard → your website → Tracking script
While your tracking domain is pending and the script hasn't been seen yet, the status band reads Not seen yet with Events start once your tracking domain is live, and its tracking domain link opens Domain. The head and body scripts are on the page to copy. In onboarding, Install tracking on your site no longer asks you to finish your domain first, and since 19 November it shows the install steps without a checklist of its own beside them. It does need your tracking subdomain to be created: until it is, the step says Your tracking domain isn't created yet with Open Domain, and since 18 November the setup guide's Scripts card reads Finish Domain first. Once the subdomain is created, you can install while its DNS is pending.
When to use it: When a DNS change is still spreading, or someone else manages your DNS and you want the script on your site in the meantime.
How does it work?
The script needs only the tracking subdomain Crisper creates when billing starts; DNS and HTTPS decide when events arrive, not when you can install. If that subdomain doesn't exist yet, the page says Your tracking domain isn't created yet. Before billing it adds that Crisper creates it when billing starts; on a website with billing, choose Open Domain to try again.
An installed script does not mean events are arriving
Events reach Crisper only once your tracking domain's DNS and HTTPS are live. The first Purchase or Lead step waits for both the live domain and the script, so finish the Domain page and then test a conversion.
Read next
Follow your domain setup, check your tracking subdomain, or hand your developer the setup instructions.
10What else changed in tracking setup?
Store orders reach Meta with their value, order ID and buyer details
Orders that your Shopify store, or the Crisper plugin on a WooCommerce store, reports straight to Crisper now reach Meta with the order's value and currency, its order ID, and the buyer's email, phone, name, city, state, postcode and country when the order includes them. The order ID is also the event's ID, so a repeated report of the same order carries the same ID. These orders keep the event names they had before. Purchases your tracking script sends from the browser keep their own event ID, and a field reaches Meta only when the store sends it. To check what Meta accepted, open the order's event in Logs and read Meta's reply.
Saving the Meta data sharing restriction switch (called Meta data sharing until 19 November) in a website's Settings now applies it to your tracking straight away on an active or trial website; before, the change waited for your next integration save.
Domain marks the script added only once it is seen
On a website's Domain page, the tracking-script step reads Script added only after Crisper has seen the script load on your site or received its first event, dated by the earlier of the two. A script that was generated but not seen yet stays the current step, with its date, for example Generated Nov 11, 9:30 AM · not seen on the site yet. The DNS step in new website setup is unchanged.
The tracking subdomain checker scans the site your subdomain belongs to
When you enter a tracking subdomain, such as ctx.shop.example.com, the free tracking subdomain checker now scans the site it belongs to, shop.example.com, instead of your root domain. A name with no DNS record, one that points to a server-side tagging service, or one whose first part reads like a tracking name, such as ctx, sgtm or load, counts as a tracking subdomain. Your domain or its www name still scans your home page, and any other subdomain, such as shop.example.com, scans its own page. The verdict card names the page it scanned, as Server-side tracking on shop.example.com.
If that site already sends hits, or loads its tags, through a different subdomain from the one you typed, the fix says so with Your site already sends hits through another subdomain or Your tags load from another subdomain, without naming it. For a tracking subdomain you typed, the checker no longer suggests adding a new one. DNS is still read for the exact name you typed, and older saved checks keep the page they scanned.
A website's domain reads Verified only once HTTPS is ready
On All websites, a site's Domain now reads Verified only when its tracking subdomain's DNS and HTTPS are both ready, in its row and in its details alike. Until then it shows what is left, such as Setting up HTTPS while the certificate is still being set up, instead of Verified. A site whose setup status can't be read yet still shows Not verified. After you change a website's tracking subdomain, Crisper checks HTTPS again for the new name, and only traffic on the new name counts as the script being seen. The setup tiles in a site's details stack on phones and wrap instead of cutting off their labels.
Onboarding uses the dashboard's layout, with the setup guide beside every step
Onboarding now uses the full width of the screen, like the dashboard, while steps with a form keep a readable width. Your setup guide sits beside every step from Website to First event on tablet-width screens and wider, lights the step you are on and uses the same step names and icons as the setup checklist. On wider screens it stays in place while the step scrolls.
The guide's Scripts card reads Install, then Code ready once your code is generated. Until your tracking subdomain is created it reads Finish Domain first, and the Scripts step says Your tracking domain isn't created yet, with a link to Open Domain. A setup call you didn't book now reads Not booked in the setup checklist once you are past it, instead of Up next. The steps themselves work as before.
Tracking script points WordPress and Shopify sites to their plugin or app
If your website runs on WordPress, Shopify or another platform that installs tracking with its own plugin or app (Magento, BigCommerce, Wix, PrestaShop or Salla), and a different platform is picked for its install, a line now says so, for example This site runs WordPress. Install tracking with the WordPress plugin. Its Switch to WordPress link changes the install back to that platform. Every platform but WordPress says app instead of plugin. Pasting the code yourself still works.
The line shows on the Tracking script page and on onboarding's Install tracking on your site step, and it goes away once traffic from your site reaches Crisper. That onboarding step also no longer has a checklist of its own; once traffic arrives it says Traffic from this site is reaching Crisper, with View logs, unless the installed Crisper Shopify app's panel already says Visits are reaching Crisper.
11Should you set up your tracking subdomain with Crisper?
A passing DNS and certificate check is one part of setup. It doesn't confirm installed tracking or delivered events, so finish the script install and test a Lead or Purchase. If your DNS provider is Cloudflare, set each tracking record to DNS only; Cloudflare explains DNS-only recordsdevelopers.cloudflare.com.

We recommend Crisper if you want your Lead and Purchase events sent through a subdomain of your own site, with the DNS records, checks and next steps in one place. Our team does the setup. Tracking is live within 24 hours of full access.
12What changed in this guide
- 20 November 2026: Added how Tracking script points WordPress and Shopify sites to their plugin or app to What else changed in tracking setup. Noted that onboarding's install step no longer has its own checklist, and that the Meta switch in Settings is now called Meta data sharing restriction.
- 19 November 2026: Added how onboarding keeps the setup guide beside every step to What else changed in tracking setup. Noted that installing the script before your domain is live needs your tracking subdomain to be created, and that Meta's reply to an order is now read in Logs.
- 16 November 2026: Noted that a new account with no website and no billing now starts onboarding on Book your onboarding call.
- 15 November 2026: The page now books a free call; our team does the setup.
- 15 November 2026: Added how to install your tracking script before your domain is live, and that a website's domain reads Verified only once HTTPS is ready. Onboarding now says the domain, platform and script steps can run in any order. Updated the onboarding and welcome email sections to how they read today.
- 14 November 2026: Added how the tracking subdomain checker scans the site your subdomain belongs to, and retook two checker screenshots to match. Corrected which page the browser scan loads and when new website setup moves on from the DNS step.
- 13 November 2026: Added What else changed in tracking setup, with store orders reaching Meta with their value and order ID, Meta data sharing applying when you save, and the Domain page's Script added step. Updated the new website DNS step to the redesigned Domain page.
- 12 November 2026: Added how to install Crisper on WordPress with the Crisper plugin.